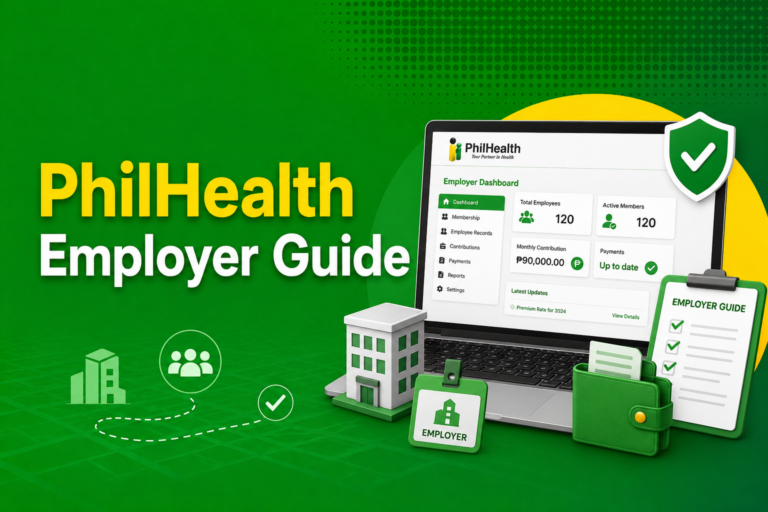
PhilHealth Online Registration: Step-by-Step Guide (2026)
Get your PhilHealth PIN without a single branch visit — every screen, every step, explained. Follow along to register, troubleshoot common errors, and check your number once you’re done.
PhilHealth online registration lets new members submit their application through the PhilHealth Member Portal and receive their 12-digit PhilHealth Identification Number, or PIN, by email, without needing to queue at a branch. This guide walks through the exact process for 2026, from the documents you need to the screen-by-screen steps, plus what to do after you register, including logging in, checking your number, and updating your details online.
What Is PhilHealth Online Registration?
PhilHealth online registration is the digital application process that lets first-time members submit their PhilHealth Member Registration Form, or PMRF, electronically through the official Member Portal. Instead of filling out a paper form at a branch, you complete the same information on screen, upload scanned copies of your documents, and submit everything for review. Once approved, PhilHealth emails your 12-digit PIN, which becomes your permanent identification number across every PhilHealth transaction for life, regardless of how many times you change PhilHeath Employers or membership types.
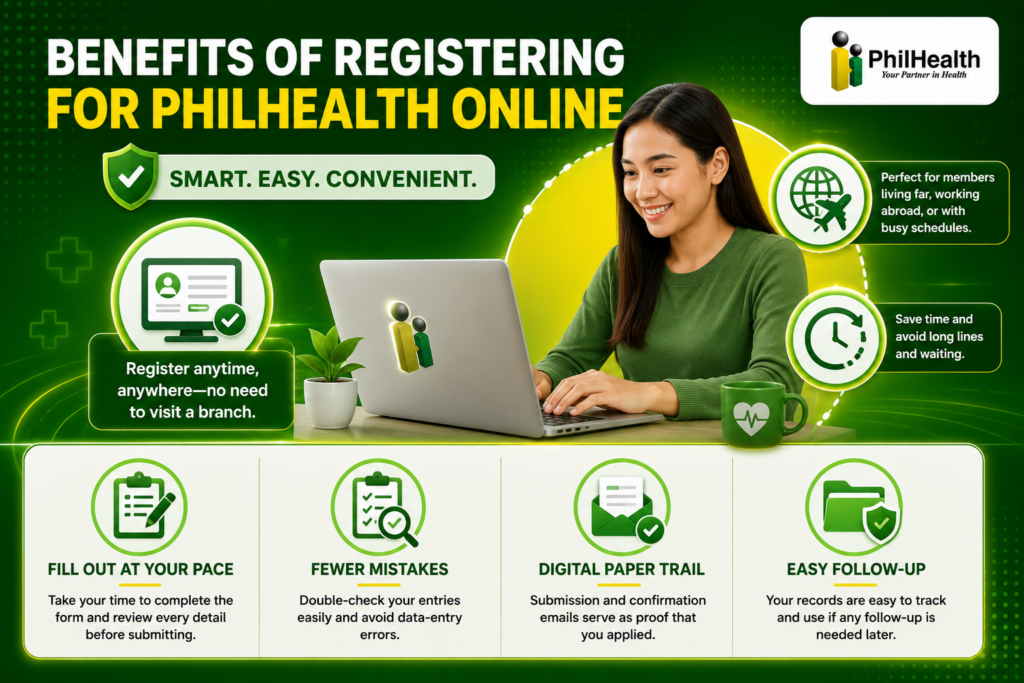
Benefits of Registering for PhilHealth Online
Registering online skips the line entirely, which matters most for members who live far from a branch, are currently working abroad, or simply cannot spare a half-day for a walk-in application. You can fill out the form at your own pace, double-check every field before submitting, and avoid the data-entry mistakes that sometimes happen when a staff member is typing quickly during a busy shift. It also gives you a digital paper trail, since your submission and confirmation emails serve as proof that you applied, which is useful if anything needs to be followed up later.
Who Can Register for PhilHealth Online?
Online registration is open to first-time applicants across most membership categories, including self-employed individuals, freelancers, voluntary members, and OFWs. Employed members can also register online to generate their own PIN, though in practice, many simply submit a PMRF to their employer’s HR department and let the company handle the paperwork instead. If you are unsure which category fits you, registering as a voluntary member is the standard starting point for anyone without an employer at the moment of application.
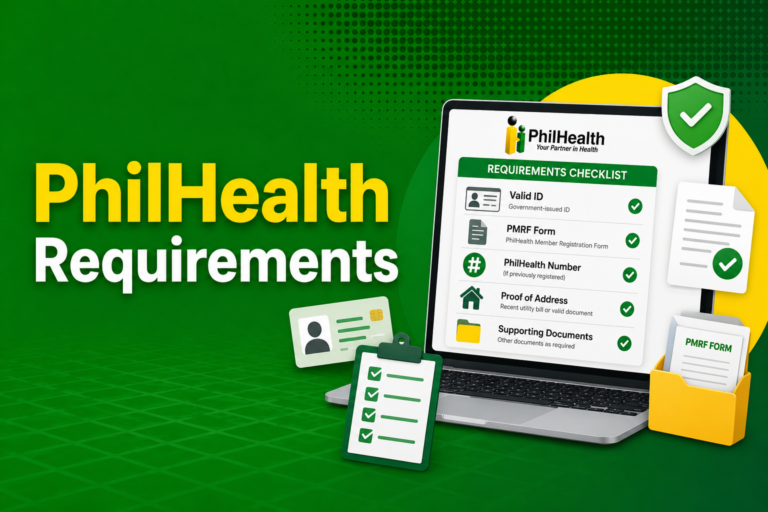
Requirements Before You Register
Gather these documents before you start, since the portal rejects incomplete submissions outright rather than letting you finish and fix things later:
- A completed PhilHealth Member Registration Form (PMRF), which you fill out directly on the portal during registration
- A valid government-issued ID, such as a passport, driver’s license, UMID, or Philippine National ID
- A PSA-issued birth certificate, especially important for first-time applicants
- Proof of income or business registration, if you are registering as self-employed or voluntary
- A working, unique email address, since the system only allows one registration per email
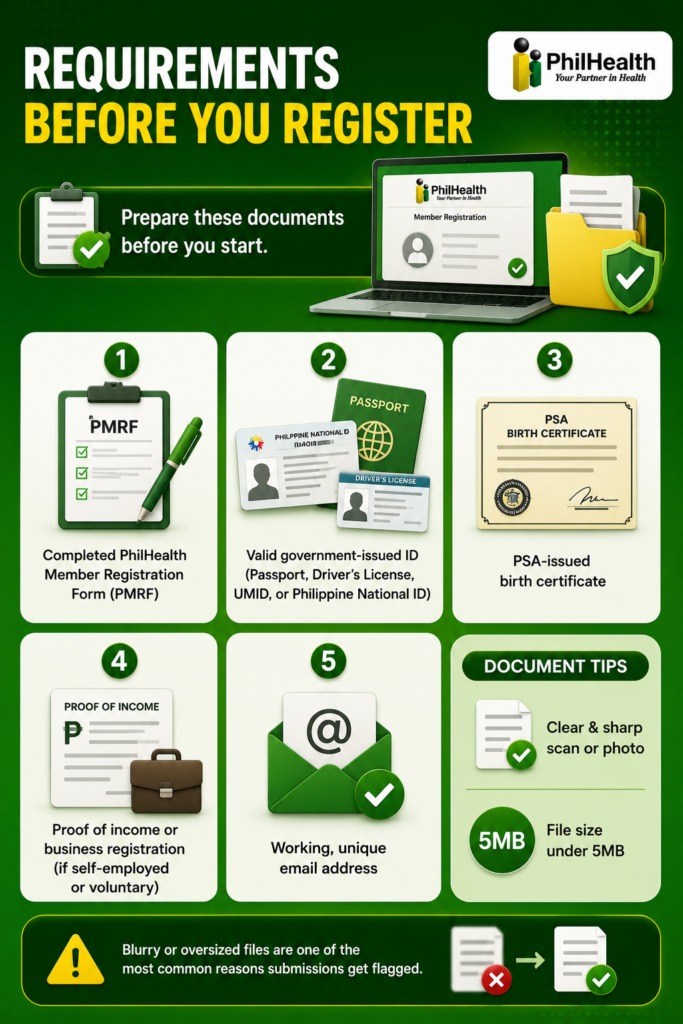
Scan or photograph your documents clearly before you begin. Files under 5MB at a reasonably sharp resolution upload without issue, while blurry or oversized scans are one of the most common reasons applications get flagged.
Step-by-Step Guide to PhilHealth Online Registration
Follow these steps in order. Each one corresponds to a single screen, which makes this a good guide to pair with screenshots if you are documenting the process for someone else.
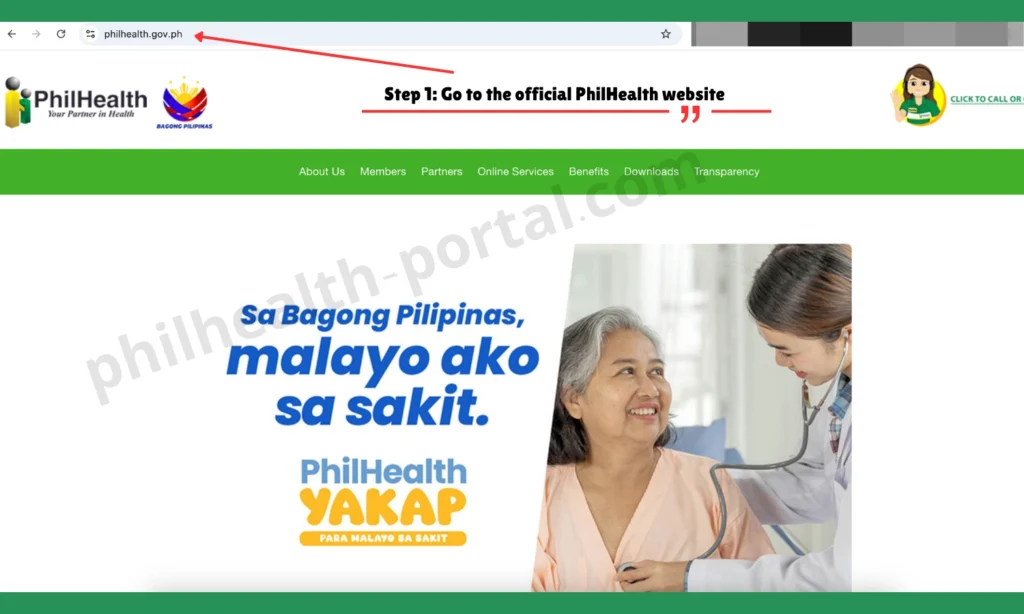
Step 1: Go to the official PhilHealth website. Open your browser and navigate to www.philhealth.gov.ph. Use Chrome or Edge if possible, since other browsers occasionally cause upload errors later in the process.
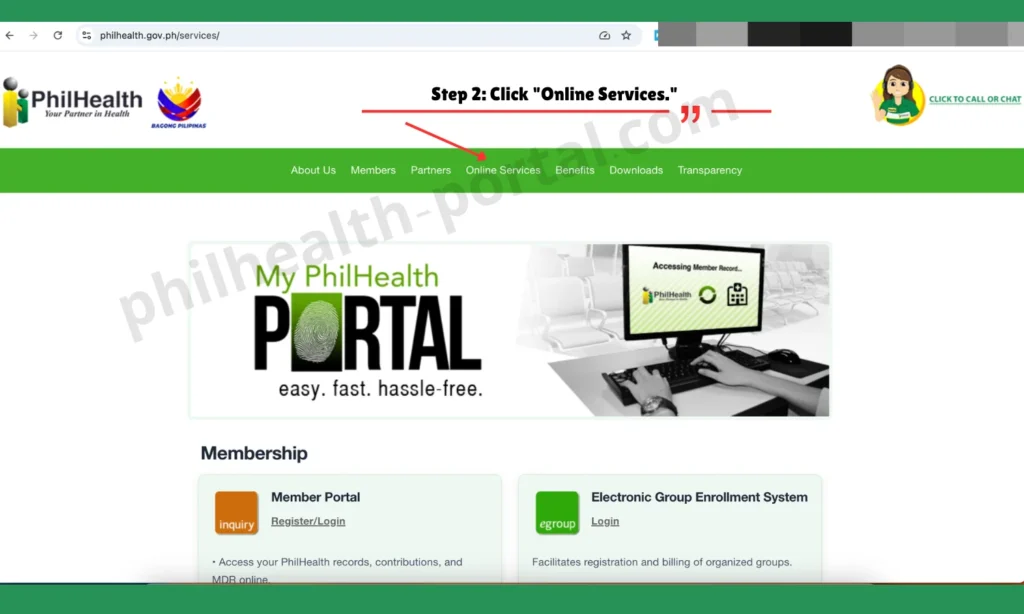
Step 2: Click “Online Services.” On the homepage, locate the “Online Services” tab in the main navigation menu and click it to open the list of available portals. Screenshot tip: highlight the “Online Services” menu item.
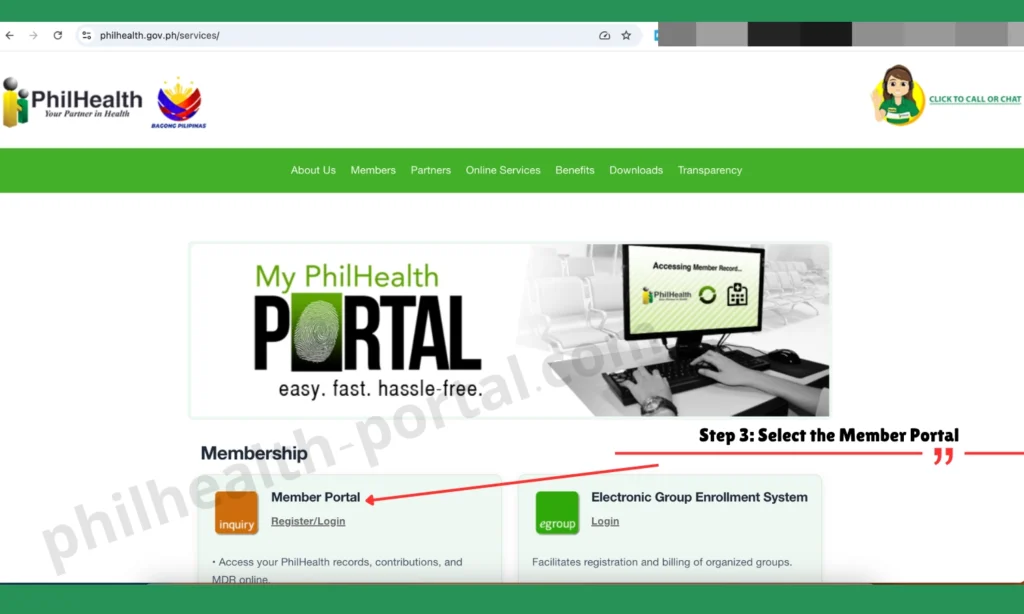
Step 3: Select the Member Portal. Choose the Member Portal option, which is the system that handles registration, login, and PIN applications for individual members. Screenshot tip: capture the portal selection screen.
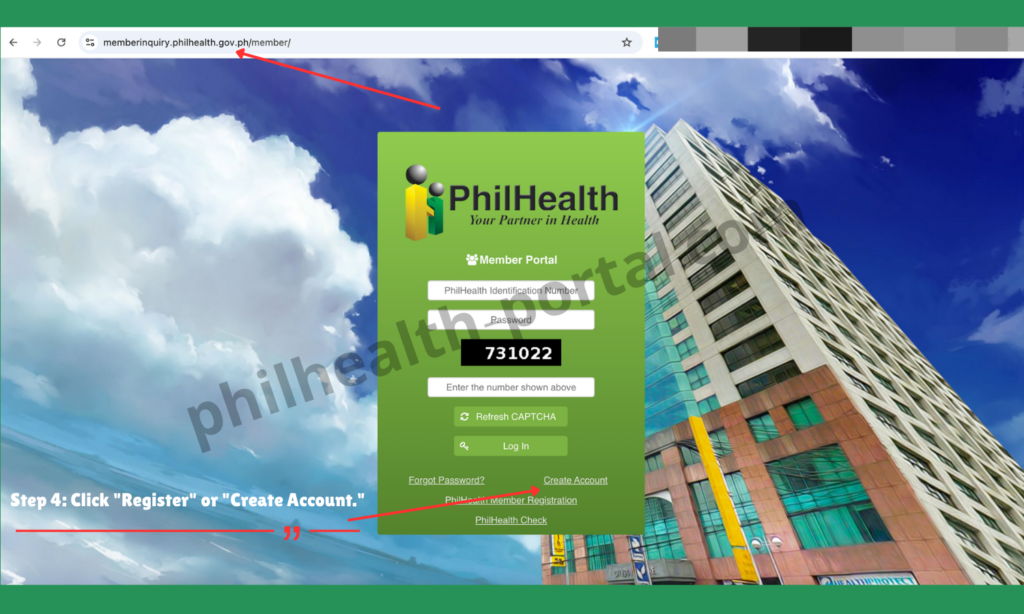
Step 4: Click “Register” or “Create Account.” First-time users need to create a portal account before applying for a PIN. Click “Create Account” and provide a valid, unique email address and a password you will remember. Screenshot tip: show the account creation form with sample (non-real) details.
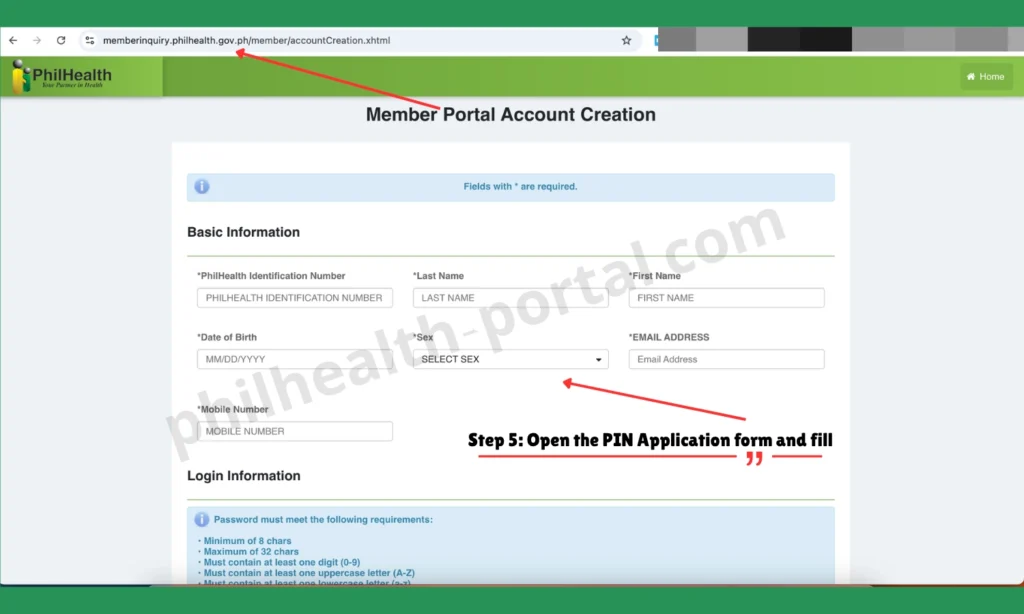
Step 5: Open the PIN Application form. Once your account is set up, look for the PIN Application or “PhilHealth Member Registration” option to begin your actual PMRF submission. Screenshot tip: capture the PIN Application landing page.
Step 6: Fill in your personal details. Enter your full name, birth date, sex, civil status, and address exactly as they appear on your PSA birth certificate. Even a missing middle initial or a “Jr.” written differently can cause a mismatch error later when a hospital checks your record. Screenshot tip: capture the blank personal information section (without submitting real data).

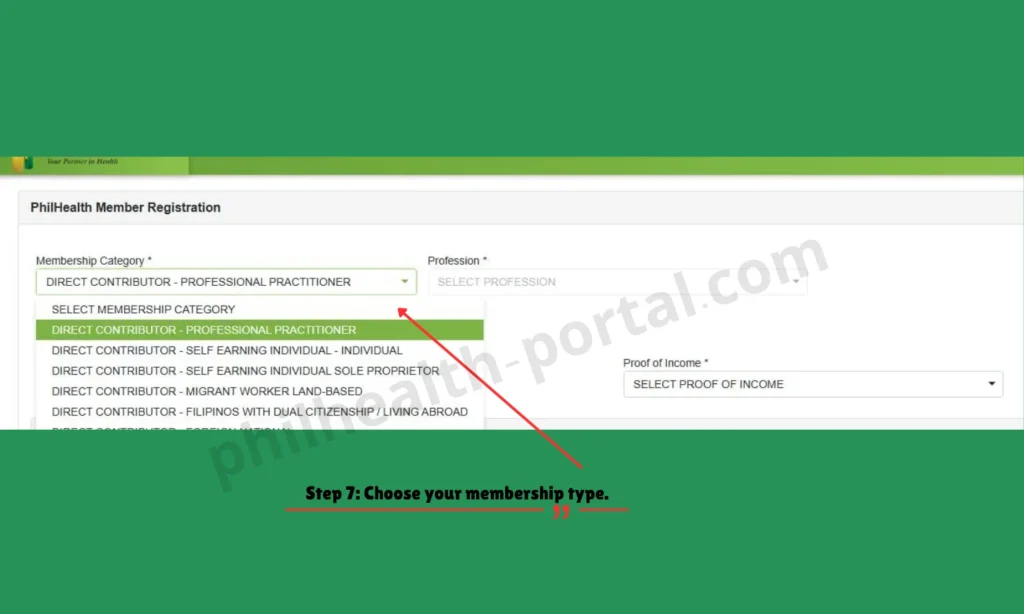
Step 7: Choose your membership type. Select your category from employed, self-employed, voluntary, or OFW, since this determines which additional fields and documents the form asks for next. Screenshot tip: capture the membership type dropdown.
Step 8: Upload your documents. Attach your valid ID, PSA birth certificate, and proof of income, if applicable. Keep each file under 5MB and make sure the text is legible before uploading. Screenshot tip: capture the upload section with placeholder files attached.
Step 9: Agree to the data privacy terms and review your entries. Tick the data privacy agreement checkbox, then scroll through every field one more time before submitting, since corrections after submission usually require a separate amendment request. Screenshot tip: capture the review screen before clicking submit.
Step 10: Submit and check your email. Click “Submit.” An acknowledgment email should arrive within minutes; check your spam folder if it does not appear right away. Your actual 12-digit PIN follows in a separate email within three to five working days. Screenshot tip: capture the confirmation message shown on screen after submitting.
PhilHealth Online Registration for New Employees
When a company hires someone new, philhealth online registration for new employee enrollment usually works one of two ways. If the new hire has not registered before, they can either complete the online registration steps above to get their own PIN and share it with HR, or simply submit a PMRF to HR, who forwards it along with the company’s regular employer reports. Employers manage their side of this process through the Electronic Premium Remittance System, accessed at the EPRS portal, where they update employee lists and submit company-wide reports once everyone has a PIN on file.
Alternative: Registering by Email
If the online portal keeps rejecting your application or you simply prefer not to use it, PhilHealth also accepts registration by email. Download and print the PMRF, fill it out completely in capital letters, and scan or photograph it in PDF or JPEG format. Email the form, along with a scanned copy of a valid ID, to the official PhilHealth Action Center address, using a subject line that includes your name and your city or province. Your PIN arrives by email the same way it would through the portal, usually within a similar three-to-five-working-day window.
How to Log In to Your PhilHealth Account Online
Once you have a PIN, logging in is straightforward.
From your dashboard, you can view your contribution history, print your MDR, update your personal details, and book appointments, all without leaving the portal.
How to Check Your PhilHealth Number Online
If you forgot your PIN after registering, the fastest way to check your PhilHealth number online is to log in to the Member Portal using your registered email address; your PIN appears on your dashboard once verified. The portal also has a dedicated “PhilHealth Check” feature on its homepage specifically for verifying member records without a full login.
If logging in isn’t working, you can skip the portal entirely and email actioncenter@philhealth.gov.ph directly — send your complete name, date of birth, and a clear photo of a valid ID. Their team verifies your identity and replies with your number by email, so it helps to send this from the same address you originally registered with.
If neither option works, because your registered email is no longer active, for instance, contact the PhilHealth Action Center directly with your full name and birth date for manual verification.
How to Print Your MDR Online
Your Member Data Record, or MDR, is the document hospitals use to confirm your coverage, and it is easy to generate once you are registered.
How to Update Your PhilHealth Information or Add Dependents Online
To update your information or add a dependent, you generally need to submit an updated PMRF rather than editing your existing record directly online. Download the PMRF, check the box for “Updating/Amendment,” and fill in only the fields that changed, attaching supporting documents such as a marriage certificate or a child’s birth certificate where relevant. Depending on your region, you can email this updated form to your regional PhilHealth office, submit it through the online portal if that option is available in your area, or bring it to your nearest LHIO. Keep in mind that an undeclared dependent will not appear on your MDR, which means a hospital can deny coverage for that family member until the update is processed.
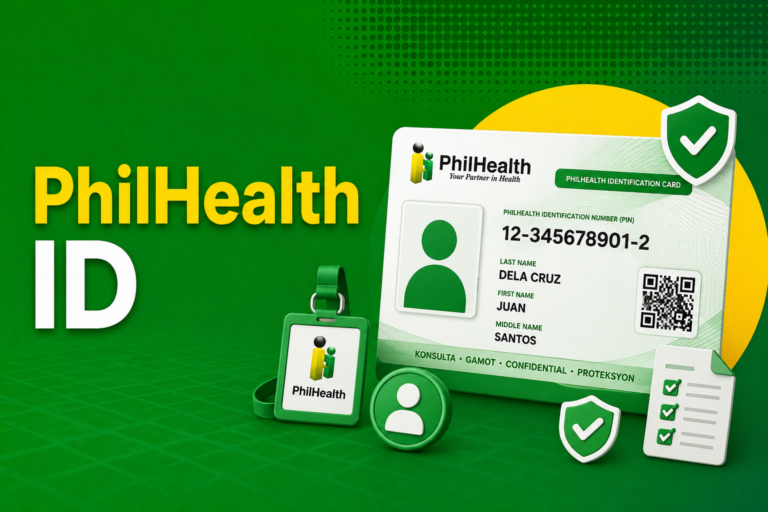
Can You Get Your PhilHealth ID Online?
Online registration only produces your PIN; it does not generate a physical ID card. There is no official PhilHealth ID card download service, so once you have your PIN, you still need to visit a branch or PhilHealth Express booth in person to have the actual card printed and released. The one workaround is the eGovPH Super App, which can display a digital version of your PhilHealth membership in its ID Wallet once your account is linked, useful as a stand-in while you wait to claim your physical card.
Common Issues and Quick Fixes
A handful of recurring problems account for most failed online applications. Here is how to work through them.
“An error was encountered” with no further explanation
This vague message usually points to a document upload problem rather than your personal details. Re-check that every required file is attached, under 5MB, and clearly legible, then resubmit.
Application Disregarded or Rejected
This is common and not necessarily a sign you did something seriously wrong. Review your documents for blurriness or mismatched names, fix whatever looks off, and submit a fresh application.
Upload Errors That Seem to Come From Nowhere
Try switching to Chrome or Edge if you were using a different browser, since some browsers are known to cause upload failures that the system blames on the file itself.
No Confirmation Email Received
Check your spam or promotions folder first. If it genuinely never arrives after a reasonable wait, try registering again with a different, unique email address, since each email can only be used once.
Name Mismatch Errors During a Hospital Claim
This usually traces back to a small inconsistency between your PMRF and your PSA birth certificate, such as a missing suffix or middle initial. Submit an amendment through an updated PMRF to correct it before you need to rely on your coverage again.
Tips for a Smooth Online Registration
Fill out your details in a quiet moment rather than rushing, since most rejections come from small mismatches rather than missing documents entirely. Scan your ID and birth certificate in advance, in good lighting, so you are not scrambling to take a clear photo mid-application. Use a personal email address you check regularly, since both your acknowledgment message and your actual PIN arrive there, and double-check your spam folder before assuming something failed. If you are applying on behalf of a family member, make sure their details on the form match their PSA documents exactly, rather than relying on memory.
Frequently Asked Questions
How do I register for PhilHealth online?
Visit www.philhealth.gov.ph, go to Online Services, open the Member Portal, create an account, fill out the PIN Application form with your personal details, upload your documents, and submit; your PIN arrives by email within three to five working days.
What documents do I need for PhilHealth online registration?
You need a completed PMRF, a valid government ID, a PSA-issued birth certificate, and proof of income if you are registering as self-employed or voluntary.
How long does PhilHealth online registration take?
Submission itself takes about ten to fifteen minutes if your documents are ready; your 12-digit PIN typically arrives by email within three to five working days afterward.
Can I get my PhilHealth ID card online?
No. Online registration only generates your PIN; the physical ID card must still be claimed in person at a PhilHealth branch or PhilHealth Express booth.
How do I check my PhilHealth number online if I forgot it?
Log in to the Member Portal using your registered email address to view your PIN on your dashboard, or use the portal’s “PhilHealth Check” feature to verify your record.
Why was my PhilHealth online application rejected?
The most common reasons are blurry or oversized document uploads, a name that does not exactly match your PSA birth certificate, or using a browser other than Chrome or Edge during submission.
Can employed members register for PhilHealth online?
Yes, though many employed members simply submit a PMRF to their employer’s HR department instead, since the employer typically handles the registration as part of onboarding.
What if I don’t receive my PhilHealth PIN after registering?
Check your spam folder first, then allow the full three-to-five working day window before contacting the PhilHealth Action Center to follow up on your application.
Conclusion
PhilHealth online registration removes the need for a branch visit, but it rewards careful preparation more than speed. Getting your documents scanned clearly, matching every detail to your PSA birth certificate, and using a browser the portal actually supports will save you from the vague error messages and rejected applications that trip up a lot of first-time applicants. Once your PIN arrives, take a few minutes to log in, confirm your details are correct, and print your MDR, so you already have everything in order the next time you need to use your coverage.